U-BLOX NINA B302 e WIFI + MQTT - ARDUINO

O objetivo deste BLOG é mostrar um exemplo em ARDUINO que permite o NINA B302 se comunicar com um servidor MQTT (broker.mqtt-dashboard.com) via WIFI COPROCESSOR baseado no NINA W102, via 802.11
WIFI COPROCESSOR é baseado no NINA W102, o qual permite que você tenha acesso a INTERNET, via SPI.
Utilize a programação clássica com Sockets do Arduino!
WIFI COPROCESSOR é baseado no NINA W102, o qual permite que você tenha acesso a INTERNET, via SPI.
Utilize a programação clássica com Sockets do Arduino!
MQTT
Para os dispositivos de Internet das Coisas (IoT), a conexão com a Internet é um requisito. A conexão com a Internet permite que os dispositivos trabalhem entre si e com serviços de backend. O protocolo de rede subjacente da Internet é o TCP/IP. Desenvolvido com base na pilha TCP/IP, o MQTT (Message Queue Telemetry Transport) tornou-se o padrão para comunicações de IoT.


COPROCESSOR PARA O NINA B302

MONTAGEM

Adquirimos então os seguintes componentes


-Botão de RESET;
-Botão de Modo BOOTLOADER (W102);
-Plugável no PROTOBOARD;
-Acesso às várias GPIOS;
Pequena

Baixe e instale o Arduino IDE
Inicie o Arduino IDE, vá em Preferências e adicione
https://www.adafruit.com/package_adafruit_index.json

Abra o Boards Manager no menu Tools -> Board e instale o "Adafruit nRF52 by Adafruit"
Selecione sua placa nRF5 no menu Ferramentas -> Placa
Adafruit Bluefruit nRF52 Feather

OBSERVAÇÃO: Durante a instalação, o Arduino IDE leva alguns minutos para extrair as ferramentas após o download, por favor, seja paciente.
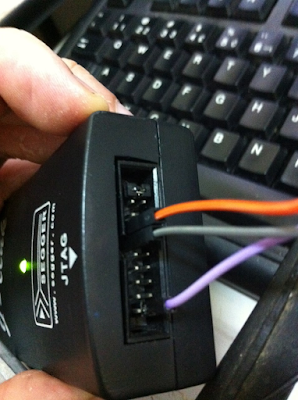
Use o gravador SEGGER JLINK para gravar o BREAKOUT com módulo NINA B302, conecte nos pinos do SWCLK (pino 7) e SWDIO (pino 9) do SEGGER JLINK nos pinos SWDCLK e SWDIO do BREAKOUT (pinos nas laterais, próximo à antena). Não esquecer de ligar os GND do BREAKOUT no GND do SEGGER JTAG, bem como alimentar o BREAKOUT com 3.3V.

Ligue os pinos SWD DIO e CLK ...

...nestes pinos da placa BREAKOUT

Você pode também usar o ST-LINK V2

Abra J-FLASH lite e grave o bootloader da Adafruit

O mesmo se encontra em
....\packages\adafruit\hardware\nrf52\0.19.0\bootloader\feather_nrf52840_express
Compile depois para o NINA B302
https://github.com/adafruit/Adafruit_nRF52_Bootloader
Com ele, você poderá transferir programas via DFU USB. Maiores detalhes sobre este bootloader
https://learn.adafruit.com/introducing-the-adafruit-nrf52840-feather/update-bootloader
Segundo a documentação, se você pressionar o reset, o módulo aguardará por um certo tempo se há algo sendo enviado pelo Arduino, ou seja, o programa a ser gravado via DFU.
ATENÇÃO, o bootloader usa USB para gravação do NINA 302, OU SEJA, CRIA UMA COMM VIRTUAL, TAMBÉM PARA SER A SERIAL PADRÃO DO ARDUINO
INSTALE OS DRIVERS
https://github.com/adafruit/Adafruit_Windows_Drivers
Conecte na USB + e USB - um cabo USB, AGUARDE INSTALAR OS DRIVERS

Aqui você encontra variant.cpp e variant.h e boards.txt
https://ricardoadulis.sharepoint.com/:f:/r/sites/smartcore/Shared%20Documents/---%20SmartCore%20-%20tecnico%20publico/NINA%20B302/Arduino_variant?csf=1&web=1&e=7URfTD
Ao copiá-los e executar o ARDUINO teremos o NINA B302 na lista.

ÓTIMA REFERENCIA PARA PINOS DO ARDUINO E PINOS (GPIOS) DO NINA B302

https://www.u-blox.com/sites/default/files/NINA-B3_DataSheet_%28UBX-17052099%29.pdf
Ligue os pino do NINA B302 no NINA W102 (com WIFININA GRAVADO)
|
|
BREAKOUT B3 |
|
BREAKOUT W1 |
|
|
CS |
IO1 |
P0.13 |
IO28 |
5 |
|
READY |
IO2 |
P0.14 |
IO7 |
33 |
|
RESET |
IO21 |
P1.12 |
RESET |
RESET |
|
SCK |
IO45 |
P0.07 |
IO29 |
18 |
|
MOSI |
IO3 |
P0.15 |
IO31 |
14 |
|
MISO |
IO8 |
P1.00 |
IO1 |
23 |
|
GPIO0 |
IO4 |
P0.16 |
IO27 |
0 |
|
|
|
|
|
|

INSTALE LIB WIFI GENERIC - EXEMPLOS QUE USAM W102 COPROCESSOR
Thanks to Khoi Hoang to help to port WIFI GENERIC to NINA B302
https://github.com/khoih-prog/WiFiNINA_Generic
Instale LIB mqtt
mqtt_esp8266
Atenção, o mesmo será modificado para trabalhar com o co-processador W102

Altere de
#include <ESP8266WiFi.h>
para
#include <WiFiNINA_Generic.h>
e
BUILTIN_LED
para
LED_BUILTIN
Código final
/*
Basic ESP8266 MQTT example
This sketch demonstrates the capabilities of the pubsub library in combination
with the ESP8266 board/library.
It connects to an MQTT server then:
- publishes "hello world" to the topic "outTopic" every two seconds
- subscribes to the topic "inTopic", printing out any messages
it receives. NB - it assumes the received payloads are strings not binary
- If the first character of the topic "inTopic" is an 1, switch ON the ESP Led,
else switch it off
It will reconnect to the server if the connection is lost using a blocking
reconnect function. See the 'mqtt_reconnect_nonblocking' example for how to
achieve the same result without blocking the main loop.
To install the ESP8266 board, (using Arduino 1.6.4+):
- Add the following 3rd party board manager under "File -> Preferences -> Additional Boards Manager URLs":
http://arduino.esp8266.com/stable/package_esp8266com_index.json
- Open the "Tools -> Board -> Board Manager" and click install for the ESP8266"
- Select your ESP8266 in "Tools -> Board"
*/
#include <WiFiNINA_Generic.h>
#include <PubSubClient.h>
// Update these with values suitable for your network.
const char* ssid = "xxxxxxxxxxxxx";
const char* password = "xxxxxxxxxxxxxxxxx";
const char* mqtt_server = "broker.mqtt-dashboard.com";
WiFiClient espClient;
PubSubClient client(espClient);
unsigned long lastMsg = 0;
#define MSG_BUFFER_SIZE (50)
char msg[MSG_BUFFER_SIZE];
int value = 0;
void setup_wifi() {
delay(10);
// We start by connecting to a WiFi network
Serial.println();
Serial.print("Connecting to ");
Serial.println(ssid);
WiFi.begin(ssid, password);
while (WiFi.status() != WL_CONNECTED) {
delay(500);
Serial.print(".");
}
randomSeed(micros());
Serial.println("");
Serial.println("WiFi connected");
Serial.println("IP address: ");
Serial.println(WiFi.localIP());
}
void callback(char* topic, byte* payload, unsigned int length) {
Serial.print("Message arrived [");
Serial.print(topic);
Serial.print("] ");
for (int i = 0; i < length; i++) {
Serial.print((char)payload[i]);
}
Serial.println();
// Switch on the LED if an 1 was received as first character
if ((char)payload[0] == '1') {
digitalWrite(LED_BUILTIN, LOW); // Turn the LED on (Note that LOW is the voltage level
// but actually the LED is on; this is because
// it is active low on the ESP-01)
} else {
digitalWrite(LED_BUILTIN, HIGH); // Turn the LED off by making the voltage HIGH
}
}
void reconnect() {
// Loop until we're reconnected
while (!client.connected()) {
Serial.print("Attempting MQTT connection...");
// Create a random client ID
String clientId = "ESP8266Client-";
clientId += String(random(0xffff), HEX);
// Attempt to connect
if (client.connect(clientId.c_str())) {
Serial.println("connected");
// Once connected, publish an announcement...
client.publish("outTopic", "hello world");
// ... and resubscribe
client.subscribe("inTopic");
} else {
Serial.print("failed, rc=");
Serial.print(client.state());
Serial.println(" try again in 5 seconds");
// Wait 5 seconds before retrying
delay(5000);
}
}
}
void setup() {
pinMode(LED_BUILTIN, OUTPUT); // Initialize the BUILTIN_LED pin as an output
Serial.begin(115200);
setup_wifi();
client.setServer(mqtt_server, 1883);
client.setCallback(callback);
}
void loop() {
if (!client.connected()) {
reconnect();
}
client.loop();
unsigned long now = millis();
if (now - lastMsg > 2000) {
lastMsg = now;
++value;
snprintf (msg, MSG_BUFFER_SIZE, "hello world #%ld", value);
Serial.print("Publish message: ");
Serial.println(msg);
client.publish("outTopic", msg);
}
}
Compile o programa e pressione o botão para gravar.
Ao aparecer a mensagem "Upgrading target on COM...", pressione imediatamente o botão de reset do módulo NINA B302


Como podem observar, o programa será transferido!

Abra a serial e veja ser publicado dados num Topico e o CallBack

Servidor MQTT recebendo dados do Tópico do NINA B302

Servidor Mandando dados para NINA B302
Dúvidas:
suporte@smartcore.com.br
Referências:
THANKS TO Khoi Hoang
https://www.u-blox.com/en/docs/UBX-17056481
https://www.u-blox.com/sites/default/files/NINA-B3_DataSheet_%28UBX-17052099%29.pdf
https://github.com/khoih-prog/WiFiNINA_Generic
https://learn.adafruit.com/adding-a-wifi-co-processor-to-circuitpython-esp8266-esp32/firmware-files
http://broker.mqtt-dashboard.com/
https://developer.ibm.com/br/articles/iot-mqtt-why-good-for-iot/
http://www.hivemq.com/demos/websocket-client/
https://github.com/knolleary/pubsubclient/
http://www.hivemq.com/demos/websocket-client/
https://github.com/knolleary/pubsubclient/
Sobre a SMARTCORE
A SmartCore fornece módulos para comunição wireless, biometria, conectividade, rastreamento e automação.
Nosso portifólio inclui modem 2G/3G/4G/NB-IoT/Cat.M, satelital, módulos WiFi, Bluetooth, GNSS / GPS, Sigfox, LoRa, leitor de cartão, leitor QR code, mecanismo de impressão, mini-board PC, antena, pigtail, LCD, bateria, repetidor GPS e sensores.
Mais detalhes em www.smartcore.com.br