WIFI COPROCESSOR é baseado no NINA W102, o qual permite que você tenha acesso a INTERNET, via SPI.
Utilize a programação clássica com Sockets do Arduino!
NODE-RED
O Node-RED é uma ferramenta de programação baseada em fluxo, originalmente desenvolvida pela equipe de Serviços de Tecnologia Emergentes da IBM e agora parte da Fundação JS .
Programação Baseada em Fluxo
Inventado por J. Paul Morrison na década de 1970, a programação baseada em fluxo é uma maneira de descrever o comportamento de uma aplicação como uma rede de caixas pretas, ou “nós”, como são chamados no Node-RED. Cada nó tem um propósito bem definido; é dado alguns dados, faz algo com esses dados e depois passa esses dados. A rede é responsável pelo fluxo de dados entre os nós.
É um modelo que se presta muito bem a uma representação visual e o torna mais acessível a uma ampla gama de usuários. Se alguém pode dividir um problema em etapas discretas, ele pode analisar um fluxo e ter uma noção do que está fazendo; sem ter que entender as linhas individuais de código dentro de cada nó.
MONTAGEM
Adquirimos então os seguintes componentes
-Botão de RESET;
-Botão de Modo BOOTLOADER (W102);
-Plugável no PROTOBOARD;
-Acesso às várias GPIOS;
Pequena
Abaixo o roteiro para você seguir:
Baixe e instale o Arduino IDE
Inicie o Arduino IDE, vá em Preferências e adicione
https://www.adafruit.com/package_adafruit_index.json
Abra o Boards Manager no menu Tools -> Board e instale o "Adafruit nRF52 by Adafruit"
Selecione sua placa nRF5 no menu Ferramentas -> Placa
Adafruit Bluefruit nRF52 Feather
OBSERVAÇÃO: Durante a instalação, o Arduino IDE leva alguns minutos para extrair as ferramentas após o download, por favor, seja paciente.
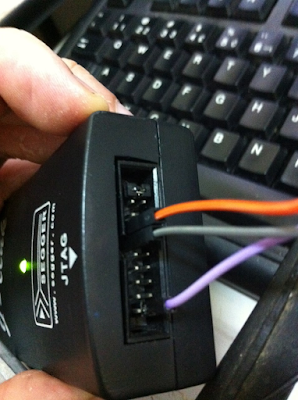
Use o gravador SEGGER JLINK para gravar o BREAKOUT com módulo NINA B302, conecte nos pinos do SWCLK (pino 7) e SWDIO (pino 9) do SEGGER JLINK nos pinos SWDCLK e SWDIO do BREAKOUT (pinos nas laterais, próximo à antena). Não esquecer de ligar os GND do BREAKOUT no GND do SEGGER JTAG, bem como alimentar o BREAKOUT com 3.3V.
Abra J-FLASH lite e grave o bootloader da Adafruit
O mesmo se encontra em
....\packages\adafruit\hardware\nrf52\0.19.0\bootloader\feather_nrf52840_express
Compile depois para o NINA B302
https://github.com/adafruit/Adafruit_nRF52_Bootloader
Com ele, você poderá transferir programas via DFU USB. Maiores detalhes sobre este bootloader
https://learn.adafruit.com/introducing-the-adafruit-nrf52840-feather/update-bootloader
Segundo a documentação, se você pressionar o reset, o módulo aguardará por um certo tempo se há algo sendo enviado pelo Arduino, ou seja, o programa a ser gravado via DFU.
ATENÇÃO, o bootloader usa USB para gravação do NINA 302, OU SEJA, CRIA UMA COMM VIRTUAL, TAMBÉM PARA SER A SERIAL PADRÃO DO ARDUINO
INSTALE OS DRIVERS
https://github.com/adafruit/Adafruit_Windows_Drivers
Conecte na USB + e USB - um cabo USB, AGUARDE INSTALAR OS DRIVERS
https://ricardoadulis.sharepoint.com/:f:/r/sites/smartcore/Shared%20Documents/---%20SmartCore%20-%20tecnico%20publico/NINA%20B302/Arduino_variant?csf=1&web=1&e=7URfTD
Ao copiá-los e executar o ARDUINO teremos o NINA B302 na lista.
ÓTIMA REFERENCIA PARA PINOS DO ARDUINO E PINOS (GPIOS) DO NINA B302
https://www.u-blox.com/sites/default/files/NINA-B3_DataSheet_%28UBX-17052099%29.pdf
|
|
BREAKOUT B3 |
|
BREAKOUT W1 |
|
|
CS |
IO1 |
P0.13 |
IO28 |
5 |
|
READY |
IO2 |
P0.14 |
IO7 |
33 |
|
RESET |
IO21 |
P1.12 |
RESET |
RESET |
|
SCK |
IO45 |
P0.07 |
IO29 |
18 |
|
MOSI |
IO3 |
P0.15 |
IO31 |
14 |
|
MISO |
IO8 |
P1.00 |
IO1 |
23 |
|
GPIO0 |
IO4 |
P0.16 |
IO27 |
0 |
|
|
|
|
|
|
INSTALE LIB WIFI GENERIC - EXEMPLOS QUE USAM W102 COPROCESSOR
Thanks to Khoi Hoang to help to port WIFI GENERIC to NINA B302
https://github.com/khoih-prog/WiFiNINA_Generic
Abra a serial
Veja o NODE-RED recebendo os Dados
Projeto Node-Red server - Import
[{"id":"5ddcb592.3a70dc","type":"tab","label":"Flow 1","disabled":false,"info":""},{"id":"9530ca8e.045538","type":"http response","z":"5ddcb592.3a70dc","name":"","statusCode":"200","headers":{},"x":460,"y":340,"wires":[]},{"id":"be436d76.bf13d","type":"debug","z":"5ddcb592.3a70dc","name":"","active":true,"tosidebar":true,"console":false,"tostatus":false,"complete":"false","x":650,"y":360,"wires":[]},{"id":"2f5a0ca4.0f9004","type":"http in","z":"5ddcb592.3a70dc","name":"","url":"update-sensor","method":"post","upload":false,"swaggerDoc":"","x":240,"y":391,"wires":[["9530ca8e.045538","be436d76.bf13d","904d0ec6.732d3"]]},{"id":"904d0ec6.732d3","type":"json","z":"5ddcb592.3a70dc","name":"","property":"payload","action":"obj","pretty":true,"x":450,"y":460,"wires":[["be436d76.bf13d","8deb0cec.b657"]]},{"id":"f32e4a01.6f0ef8","type":"ui_gauge","z":"5ddcb592.3a70dc","name":"","group":"b5806088.39ff4","order":4,"width":0,"height":0,"gtype":"gage","title":"Pressure","label":"hPa","format":"{{value}}","min":0,"max":"1200","colors":["#b366ff","#8000ff","#440088"],"seg1":"","seg2":"","x":880,"y":600,"wires":[]},{"id":"8e71a3f.85b6e6","type":"ui_gauge","z":"5ddcb592.3a70dc","name":"","group":"b5806088.39ff4","order":3,"width":0,"height":0,"gtype":"gage","title":"Humidity","label":"%","format":"{{value}}","min":0,"max":"100","colors":["#0080ff","#0062c4","#002f5e"],"seg1":"","seg2":"","x":880,"y":540,"wires":[]},{"id":"fb783753.cabd68","type":"ui_gauge","z":"5ddcb592.3a70dc","name":"","group":"b5806088.39ff4","order":2,"width":0,"height":0,"gtype":"gage","title":"Temperature","label":"ºC","format":"{{value}}","min":0,"max":"38","colors":["#00b500","#e6e600","#ca3838"],"seg1":"","seg2":"","x":890,"y":480,"wires":[]},{"id":"ecd86985.bf61c8","type":"ui_text","z":"5ddcb592.3a70dc","group":"b5806088.39ff4","order":1,"width":0,"height":0,"name":"","label":"Sensor Name","format":"{{msg.payload}}","layout":"row-spread","x":900,"y":420,"wires":[]},{"id":"8deb0cec.b657","type":"function","z":"5ddcb592.3a70dc","name":"JSON or URL Encoded","func":"var msg0 = { payload: msg.payload.api_key };\nvar msg1 = { payload: msg.payload.sensor_name };\nvar msg2 = { payload: msg.payload.temperature };\nvar msg3 = { payload: msg.payload.humidity };\nvar msg4 = { payload: msg.payload.pressure };\n\nreturn [msg0, msg1, msg2, msg3, msg4];","outputs":5,"noerr":0,"x":650,"y":460,"wires":[["be436d76.bf13d"],["ecd86985.bf61c8"],["fb783753.cabd68"],["8e71a3f.85b6e6"],["f32e4a01.6f0ef8"]]},{"id":"b5806088.39ff4","type":"ui_group","z":"","name":"SENSORS","tab":"667c00e9.9ac12","disp":true,"width":"6","collapse":false},{"id":"667c00e9.9ac12","type":"ui_tab","z":"","name":"HTTP","icon":"dashboard","order":1,"disabled":false,"hidden":false}]suporte@smartcore.com.br
Referências:
https://www.u-blox.com/en/docs/UBX-17056481
https://www.u-blox.com/sites/default/files/NINA-B3_DataSheet_%28UBX-17052099%29.pdf
https://github.com/khoih-prog/WiFiNINA_Generic
https://learn.adafruit.com/adding-a-wifi-co-processor-to-circuitpython-esp8266-esp32/firmware-files


