O objetivo deste BLOG é apresentar uma ideia geral de como o NINA W102 enviar uma temperatura Random para o Servidor Adafruit IO (MQTT). Também mostra como pode configurar via Portal os dados do servidor Adafruit bem como SSID e Password.
ADAFRUIT IO
O Adafruit IO é um sistema que torna os dados úteis. Nosso foco está na facilidade de uso e em permitir conexões de dados simples com pouca programação necessária. O IO inclui bibliotecas de clientes que agrupam nossas APIs REST e MQTT.
U-BLOX NINA W102
Módulo U-BLOX baseado no ESP32
ADAFRUIT
A Adafruit foi fundada em 2005 pela engenheira do MIT, Limor "Ladyada" Fried. Seu objetivo era criar o melhor local on-line para o aprendizado de eletrônicos e para a fabricação dos melhores produtos projetados para fabricantes de todas as idades e níveis de habilidade.
SMARTCORE
A SmartCore fornece módulos para comunição wireless, biometria, conectividade, rastreamento e automação.
Nosso portifólio inclui modem 2G/3G/4G/NB-IoT/Cat.M, satelital, módulos WiFi, Bluetooth, GNSS / GPS, Sigfox, LoRa, leitor de cartão, leitor QR code, mecanismo de impressão, mini-board PC, antena, pigtail, LCD, bateria, repetidor GPS e sensores.
Mais detalhes em www.smartcore.com.br
INSTALAÇÃO IDE ARDUINO PARA W102
1) Baixe e instale a última versão da IDE do Arduino
https://www.arduino.cc/en/Main/Software e crie uma pasta PORTABLE dentro da pasta de instalação do ARDUINO.
https://www.arduino.cc/en/Main/Software e crie uma pasta PORTABLE dentro da pasta de instalação do ARDUINO.
2) Execute a IDE do Arduino e click em files-->preferences

e digite
https://dl.espressif.com/dl/package_esp32_index.json e click OK
3) Vá agora em Tools > Board > Boards Manager


4) Procure por "ESP32 by Espressif" e instale

Aguarde alguns minutos para instalação do SDK.
5) Selecione em tools-->board o módulo u-blox NINA-W10 series
6) OK, você pode agora fechar o ARDUINO.
7) Selecione o módulo Generic ESP32 (NINA W102 é baseado no ESP32)
Instale Dependências
Sobre a LIB
- Usar rede assíncrona significa que você pode lidar com mais de uma conexão ao mesmo tempo
- Você é chamado assim que a solicitação estiver pronta e analisada
- Ao enviar a resposta, você está imediatamente pronto para lidar com outras conexões enquanto o servidor cuida do envio da resposta em segundo plano
- A velocidade é OMG
- API fácil de usar, autenticação HTTP Basic e Digest MD5 (padrão), ChunkedResponse
- Facilmente extensível para lidar com qualquer tipo de conteúdo
- Suporta Continue 100
- Plug-in Async WebSocket que oferece locais diferentes sem servidores ou portas extras
- Plug-in Async EventSource (Server-Sent Events) para enviar eventos ao navegador
- Plug-in de reescrita de URL para reescritas de URL condicionais e permanentes
- Plugin ServeStatic que suporta cache, Last-Modified, índice padrão e mais
- Motor de processamento de template simples para lidar com templates
THANKS TO Khoi Hoang
Código final
/****************************************************************************************************************************
Async_ConfigOnSwitchFS_MQTT_Ptr.ino
For ESP8266 / ESP32 boards
ESPAsync_WiFiManager is a library for the ESP8266/Arduino platform, using (ESP)AsyncWebServer to enable easy
configuration and reconfiguration of WiFi credentials using a Captive Portal.
Modified from
1. Tzapu (https://github.com/tzapu/WiFiManager)
2. Ken Taylor (https://github.com/kentaylor)
3. Alan Steremberg (https://github.com/alanswx/ESPAsyncWiFiManager)
4. Khoi Hoang (https://github.com/khoih-prog/ESP_WiFiManager)
Built by Khoi Hoang https://github.com/khoih-prog/ESPAsync_WiFiManager
Licensed under MIT license
Version: 1.0.11
Version Modified By Date Comments
------- ----------- ---------- -----------
1.0.11 K Hoang 21/08/2020 Initial coding to use (ESP)AsyncWebServer instead of (ESP8266)WebServer. Bump up to v1.0.11
to sync with ESP_WiFiManager v1.0.11
*****************************************************************************************************************************/
/****************************************************************************************************************************
This example will open a configuration portal when no WiFi configuration has been previously entered or when a button is pushed.
It is the easiest scenario for configuration but requires a pin and a button on the ESP8266/ESP32 device.
The Flash button is convenient for this on NodeMCU devices.
Also in this example a password is required to connect to the configuration portal
network. This is inconvenient but means that only those who know the password or those
already connected to the target WiFi network can access the configuration portal and
the WiFi network credentials will be sent from the browser over an encrypted connection and
can not be read by observers.
The Credentials, being input via Config Portal, will then be saved into LittleFS / SPIFFS file,
and be used to connect to Adafruit MQTT Server at "io.adafruit.com" and publish a Temperature Topic
Based on original sketch posted by user "wackoo" on https://forum.arduino.cc/index.php?topic=692108
*****************************************************************************************************************************/
#if !( defined(ESP8266) || defined(ESP32) )
#error This code is intended to run on the ESP8266 or ESP32 platform! Please check your Tools->Board setting.
#endif
// Use from 0 to 4. Higher number, more debugging messages and memory usage.
#define _ESPASYNC_WIFIMGR_LOGLEVEL_ 3
// Default is 30s, using 20s now
#define TIME_BETWEEN_MODAL_SCANS 20000
// Default is 60s, using 30s now
#define TIME_BETWEEN_MODELESS_SCANS 30000
#include <Arduino.h> // for button
#include <OneButton.h> // for button
#include <FS.h>
// Now support ArduinoJson 6.0.0+ ( tested with v6.15.2 to v6.16.1 )
#include <ArduinoJson.h> // get it from https://arduinojson.org/ or install via Arduino library manager
//Ported to ESP32
//For ESP32, To use ESP32 Dev Module, QIO, Flash 4MB/80MHz, Upload 921600
#if ESP32
#include "SPIFFS.h"
#include <esp_wifi.h>
#include <WiFi.h>
#include <WiFiClient.h>
#define ESP_getChipId() ((uint32_t)ESP.getEfuseMac())
#define LED_ON HIGH
#define LED_OFF LOW
#define FileFS SPIFFS
#else
#include <ESP8266WiFi.h> //https://github.com/esp8266/Arduino
//needed for library
#include <DNSServer.h>
#define ESP_getChipId() (ESP.getChipId())
#define LED_ON LOW
#define LED_OFF HIGH
#define USE_LITTLEFS true
#if USE_LITTLEFS
#define FileFS LittleFS
#else
#define FileFS SPIFFS
#endif
#include <LittleFS.h>
#endif
#include "Adafruit_MQTT.h" //https://github.com/adafruit/Adafruit_MQTT_Library
#include "Adafruit_MQTT_Client.h" //https://github.com/adafruit/Adafruit_MQTT_Library
#if ESP32
//See file .../hardware/espressif/esp32/variants/(esp32|doitESP32devkitV1)/pins_arduino.h
#define LED_BUILTIN 2 // Pin D2 mapped to pin GPIO2/ADC12 of ESP32, control on-board LED
#define PIN_LED 2 // Pin D2 mapped to pin GPIO2/ADC12 of ESP32, control on-board LED
#define PIN_D0 0 // Pin D0 mapped to pin GPIO0/BOOT/ADC11/TOUCH1 of ESP32
#define PIN_D1 1 // Pin D1 mapped to pin GPIO1/TX0 of ESP32
#define PIN_D2 2 // Pin D2 mapped to pin GPIO2/ADC12/TOUCH2 of ESP32
#define PIN_D3 3 // Pin D3 mapped to pin GPIO3/RX0 of ESP32
#define PIN_D4 4 // Pin D4 mapped to pin GPIO4/ADC10/TOUCH0 of ESP32
#define PIN_D5 5 // Pin D5 mapped to pin GPIO5/SPISS/VSPI_SS of ESP32
#define PIN_D6 6 // Pin D6 mapped to pin GPIO6/FLASH_SCK of ESP32
#define PIN_D7 7 // Pin D7 mapped to pin GPIO7/FLASH_D0 of ESP32
#define PIN_D8 8 // Pin D8 mapped to pin GPIO8/FLASH_D1 of ESP32
#define PIN_D9 9 // Pin D9 mapped to pin GPIO9/FLASH_D2 of ESP32
#define PIN_D10 10 // Pin D10 mapped to pin GPIO10/FLASH_D3 of ESP32
#define PIN_D11 11 // Pin D11 mapped to pin GPIO11/FLASH_CMD of ESP32
#define PIN_D12 12 // Pin D12 mapped to pin GPIO12/HSPI_MISO/ADC15/TOUCH5/TDI of ESP32
#define PIN_D13 13 // Pin D13 mapped to pin GPIO13/HSPI_MOSI/ADC14/TOUCH4/TCK of ESP32
#define PIN_D14 14 // Pin D14 mapped to pin GPIO14/HSPI_SCK/ADC16/TOUCH6/TMS of ESP32
#define PIN_D15 15 // Pin D15 mapped to pin GPIO15/HSPI_SS/ADC13/TOUCH3/TDO of ESP32
#define PIN_D16 16 // Pin D16 mapped to pin GPIO16/TX2 of ESP32
#define PIN_D17 17 // Pin D17 mapped to pin GPIO17/RX2 of ESP32
#define PIN_D18 18 // Pin D18 mapped to pin GPIO18/VSPI_SCK of ESP32
#define PIN_D19 19 // Pin D19 mapped to pin GPIO19/VSPI_MISO of ESP32
#define PIN_D21 21 // Pin D21 mapped to pin GPIO21/SDA of ESP32
#define PIN_D22 22 // Pin D22 mapped to pin GPIO22/SCL of ESP32
#define PIN_D23 23 // Pin D23 mapped to pin GPIO23/VSPI_MOSI of ESP32
#define PIN_D24 24 // Pin D24 mapped to pin GPIO24 of ESP32
#define PIN_D25 25 // Pin D25 mapped to pin GPIO25/ADC18/DAC1 of ESP32
#define PIN_D26 26 // Pin D26 mapped to pin GPIO26/ADC19/DAC2 of ESP32
#define PIN_D27 27 // Pin D27 mapped to pin GPIO27/ADC17/TOUCH7 of ESP32
#define PIN_D32 32 // Pin D32 mapped to pin GPIO32/ADC4/TOUCH9 of ESP32
#define PIN_D33 33 // Pin D33 mapped to pin GPIO33/ADC5/TOUCH8 of ESP32
#define PIN_D34 34 // Pin D34 mapped to pin GPIO34/ADC6 of ESP32
//Only GPIO pin < 34 can be used as output. Pins >= 34 can be only inputs
//See .../cores/esp32/esp32-hal-gpio.h/c
//#define digitalPinIsValid(pin) ((pin) < 40 && esp32_gpioMux[(pin)].reg)
//#define digitalPinCanOutput(pin) ((pin) < 34 && esp32_gpioMux[(pin)].reg)
//#define digitalPinToRtcPin(pin) (((pin) < 40)?esp32_gpioMux[(pin)].rtc:-1)
//#define digitalPinToAnalogChannel(pin) (((pin) < 40)?esp32_gpioMux[(pin)].adc:-1)
//#define digitalPinToTouchChannel(pin) (((pin) < 40)?esp32_gpioMux[(pin)].touch:-1)
//#define digitalPinToDacChannel(pin) (((pin) == 25)?0:((pin) == 26)?1:-1)
#define PIN_D35 35 // Pin D35 mapped to pin GPIO35/ADC7 of ESP32
#define PIN_D36 36 // Pin D36 mapped to pin GPIO36/ADC0/SVP of ESP32
#define PIN_D39 39 // Pin D39 mapped to pin GPIO39/ADC3/SVN of ESP32
#define PIN_RX0 3 // Pin RX0 mapped to pin GPIO3/RX0 of ESP32
#define PIN_TX0 1 // Pin TX0 mapped to pin GPIO1/TX0 of ESP32
#define PIN_SCL 22 // Pin SCL mapped to pin GPIO22/SCL of ESP32
#define PIN_SDA 21 // Pin SDA mapped to pin GPIO21/SDA of ESP32
#else
//PIN_D0 can't be used for PWM/I2C
#define PIN_D0 16 // Pin D0 mapped to pin GPIO16/USER/WAKE of ESP8266. This pin is also used for Onboard-Blue LED. PIN_D0 = 0 => LED ON
#define PIN_D1 5 // Pin D1 mapped to pin GPIO5 of ESP8266
#define PIN_D2 4 // Pin D2 mapped to pin GPIO4 of ESP8266
#define PIN_D3 0 // Pin D3 mapped to pin GPIO0/FLASH of ESP8266
#define PIN_D4 2 // Pin D4 mapped to pin GPIO2/TXD1 of ESP8266
#define PIN_LED 2 // Pin D4 mapped to pin GPIO2/TXD1 of ESP8266, NodeMCU and WeMoS, control on-board LED
#define PIN_D5 14 // Pin D5 mapped to pin GPIO14/HSCLK of ESP8266
#define PIN_D6 12 // Pin D6 mapped to pin GPIO12/HMISO of ESP8266
#define PIN_D7 13 // Pin D7 mapped to pin GPIO13/RXD2/HMOSI of ESP8266
#define PIN_D8 15 // Pin D8 mapped to pin GPIO15/TXD2/HCS of ESP8266
//Don't use pins GPIO6 to GPIO11 as already connected to flash, etc. Use them can crash the program
//GPIO9(D11/SD2) and GPIO11 can be used only if flash in DIO mode ( not the default QIO mode)
#define PIN_D11 9 // Pin D11/SD2 mapped to pin GPIO9/SDD2 of ESP8266
#define PIN_D12 10 // Pin D12/SD3 mapped to pin GPIO10/SDD3 of ESP8266
#define PIN_SD2 9 // Pin SD2 mapped to pin GPIO9/SDD2 of ESP8266
#define PIN_SD3 10 // Pin SD3 mapped to pin GPIO10/SDD3 of ESP8266
#define PIN_D9 3 // Pin D9 /RX mapped to pin GPIO3/RXD0 of ESP8266
#define PIN_D10 1 // Pin D10/TX mapped to pin GPIO1/TXD0 of ESP8266
#define PIN_RX 3 // Pin RX mapped to pin GPIO3/RXD0 of ESP8266
#define PIN_TX 1 // Pin RX mapped to pin GPIO1/TXD0 of ESP8266
#define LED_PIN 16 // Pin D0 mapped to pin GPIO16 of ESP8266. This pin is also used for Onboard-Blue LED. PIN_D0 = 0 => LED ON
#endif //ESP32
#if ESP32
const int BUTTON_PIN = PIN_D27;
const int RED_LED = PIN_D26;
const int BLUE_LED = PIN_D25;
#else
const int BUTTON_PIN = PIN_D1;
const int RED_LED = PIN_D2;
const int BLUE_LED = PIN_D5;
#endif //ESP32
uint32_t timer = millis();
int some_number = 5; //To be published as temperature
const char* CONFIG_FILE = "/ConfigMQTT.json";
// Indicates whether ESP has WiFi credentials saved from previous session
bool initialConfig = true; //default false
// Default configuration values for Adafruit IO MQTT
// This actually works
#define AIO_SERVER "io.adafruit.com"
#define AIO_SERVERPORT 1883 //1883, or 8883 for SSL
#define AIO_USERNAME "tcpipchip" //Adafruit IO
#define AIO_KEY "aio_nCCn53F8958LaR0BAqDtOnO1mtVo"
// Labels for custom parameters in WiFi manager
#define AIO_SERVER_Label "AIO_SERVER_Label"
#define AIO_SERVERPORT_Label "AIO_SERVERPORT_Label"
#define AIO_USERNAME_Label "AIO_USERNAME_Label"
#define AIO_KEY_Label "AIO_KEY_Label"
// Just dummy topics. To be updated later when got valid data from FS or Config Portal
String MQTT_Pub_Topic = "private/feeds/Temperature";
// Variables to save custom parameters to...
// I would like to use these instead of #defines
#define custom_AIO_SERVER_LEN 20
#define custom_AIO_USERNAME_LEN 20
#define custom_AIO_KEY_LEN 40
char custom_AIO_SERVER[custom_AIO_SERVER_LEN];
int custom_AIO_SERVERPORT;
char custom_AIO_USERNAME[custom_AIO_USERNAME_LEN];
char custom_AIO_KEY[custom_AIO_KEY_LEN];
// Function Prototypes
bool readConfigFile();
bool writeConfigFile();
// For Config Portal
// SSID and PW for Config Portal
String ssid = "ESP_" + String(ESP_getChipId(), HEX);
const char* password = "your_password";
// SSID and PW for your Router
String Router_SSID;
String Router_Pass;
// Use false if you don't like to display Available Pages in Information Page of Config Portal
// Comment out or use true to display Available Pages in Information Page of Config Portal
// Must be placed before #include <ESPAsync_WiFiManager.h>
#define USE_AVAILABLE_PAGES false
// From v1.0.10 to permit disable/enable StaticIP configuration in Config Portal from sketch. Valid only if DHCP is used.
// You'll loose the feature of dynamically changing from DHCP to static IP, or vice versa
// You have to explicitly specify false to disable the feature.
//#define USE_STATIC_IP_CONFIG_IN_CP false
// Use false to disable NTP config. Advisable when using Cellphone, Tablet to access Config Portal.
// See Issue 23: On Android phone ConfigPortal is unresponsive (https://github.com/khoih-prog/ESP_WiFiManager/issues/23)
#define USE_ESP_WIFIMANAGER_NTP false
// Use true to enable CloudFlare NTP service. System can hang if you don't have Internet access while accessing CloudFlare
// See Issue #21: CloudFlare link in the default portal (https://github.com/khoih-prog/ESP_WiFiManager/issues/21)
#define USE_CLOUDFLARE_NTP false
// New in v1.0.11
#define USING_CORS_FEATURE true
//////
// Use USE_DHCP_IP == true for dynamic DHCP IP, false to use static IP which you have to change accordingly to your network
#if (defined(USE_STATIC_IP_CONFIG_IN_CP) && !USE_STATIC_IP_CONFIG_IN_CP)
// Force DHCP to be true
#if defined(USE_DHCP_IP)
#undef USE_DHCP_IP
#endif
#define USE_DHCP_IP true
#else
// You can select DHCP or Static IP here
//#define USE_DHCP_IP true
#define USE_DHCP_IP false
#endif
#if ( USE_DHCP_IP || ( defined(USE_STATIC_IP_CONFIG_IN_CP) && !USE_STATIC_IP_CONFIG_IN_CP ) )
// Use DHCP
#warning Using DHCP IP
IPAddress stationIP = IPAddress(0, 0, 0, 0);
IPAddress gatewayIP = IPAddress(192, 168, 100, 1);
IPAddress netMask = IPAddress(255, 255, 255, 0);
#else
// Use static IP
#warning Using static IP
#ifdef ESP32
IPAddress stationIP = IPAddress(192, 168, 100, 232);
#else
IPAddress stationIP = IPAddress(192, 168, 100, 186);
#endif
IPAddress gatewayIP = IPAddress(192, 168, 100, 1);
IPAddress netMask = IPAddress(255, 255, 255, 0);
#endif
#define USE_CONFIGURABLE_DNS true
IPAddress dns1IP = gatewayIP;
IPAddress dns2IP = IPAddress(8, 8, 8, 8);
#include <ESPAsync_WiFiManager.h> //https://github.com/khoih-prog/ESPAsync_WiFiManager
AsyncWebServer webServer(80);
DNSServer dnsServer;
//Button config
OneButton btn = OneButton(
BUTTON_PIN, // Input pin for the button
true, // Button is active LOW
true // Enable internal pull-up resistor
);
// Create an ESP32 WiFiClient class to connect to the MQTT server
WiFiClient *client = NULL;
Adafruit_MQTT_Client *mqtt = NULL;
Adafruit_MQTT_Publish *Temperature = NULL;
void heartBeatPrint(void)
{
static int num = 1;
if (WiFi.status() == WL_CONNECTED)
Serial.print("W"); // W means connected to WiFi
else
Serial.print("N"); // N means not connected to WiFi
if (num == 40)
{
Serial.println();
num = 1;
}
else if (num++ % 5 == 0)
{
Serial.print(" ");
}
}
void publishMQTT(void)
{
MQTT_connect();
//if (Temperature->publish((int) random(10, 30))) <============
if (Temperature->publish(some_number))
{
//Serial.println(F("Failed to send value to Temperature feed!"));
Serial.print("T"); // T means publishing OK
}
else
{
//Serial.println(F("Value to Temperature feed sucessfully sent!"));
Serial.print("F"); // F means publishing failure
}
}
void check_status()
{
static ulong checkstatus_timeout = 0;
#define HEARTBEAT_INTERVAL 10000L
// Print hearbeat every HEARTBEAT_INTERVAL (10) seconds.
if ((millis() > checkstatus_timeout) || (checkstatus_timeout == 0))
{
if (WiFi.status() == WL_CONNECTED)
{
publishMQTT();
}
heartBeatPrint();
checkstatus_timeout = millis() + HEARTBEAT_INTERVAL;
}
}
void deleteOldInstances(void)
{
// Delete previous instances
if (mqtt)
{
delete mqtt;
mqtt = NULL;
Serial.println("Deleting old MQTT object");
}
if (Temperature)
{
delete Temperature;
Temperature = NULL;
Serial.println("Deleting old Temperature object");
}
}
void createNewInstances(void)
{
if (!client)
{
client = new WiFiClient;
if (client)
{
Serial.println("\nCreating new WiFi client object OK");
}
else
Serial.println("\nCreating new WiFi client object failed");
}
// Create new instances from new data
if (!mqtt)
{
// Setup the MQTT client class by passing in the WiFi client and MQTT server and login details.
mqtt = new Adafruit_MQTT_Client(client, custom_AIO_SERVER, custom_AIO_SERVERPORT, custom_AIO_USERNAME, custom_AIO_KEY);
if (mqtt)
{
Serial.println("Creating new MQTT object OK");
Serial.println(String("AIO_SERVER = ") + custom_AIO_SERVER + ", AIO_SERVERPORT = " + custom_AIO_SERVERPORT);
Serial.println(String("AIO_USERNAME = ") + custom_AIO_USERNAME + ", AIO_KEY = " + custom_AIO_KEY);
}
else
Serial.println("Creating new MQTT object failed");
}
if (!Temperature)
{
Temperature = new Adafruit_MQTT_Publish(mqtt, MQTT_Pub_Topic.c_str());
Serial.println("Creating new MQTT_Pub_Topic, Temperature = " + MQTT_Pub_Topic);
if (Temperature)
{
Serial.println("Creating new Temperature object OK");
Serial.println(String("Temperature MQTT_Pub_Topic = ") + MQTT_Pub_Topic);
}
else
Serial.println("Creating new Temperature object failed");
}
}
// Setup function
void setup()
{
// Put your setup code here, to run once
Serial.begin(115200);
while (!Serial);
Serial.println("\nStarting Async_ConfigOnSwichFS_MQTT_Ptr on " + String(ARDUINO_BOARD));
btn.attachClick(handleClick);
btn.attachDoubleClick(handleDoubleClick);
btn.attachLongPressStop(handleLongPressStop);
// Initialize the LED digital pin as an output.
pinMode(BLUE_LED, OUTPUT);
// Mount the filesystem
bool result = FileFS.begin();
#if USE_LITTLEFS
Serial.print("\nLittleFS opened: ");
#else
Serial.print("\nSPIFFS opened: ");
#endif
Serial.println(result? "OK" : "Failed");
if (!readConfigFile())
{
Serial.println("Failed to read configuration file, using default values");
}
unsigned long startedAt = millis();
//Here starts the WiFi Manager initialization
//Local intialization. Once its business is done, there is no need to keep it around
ESPAsync_WiFiManager ESPAsync_wifiManager(&webServer, &dnsServer, "ConfigOnSwichFS-MQTT");
ESPAsync_wifiManager.setMinimumSignalQuality(-1);
// From v1.0.10 only
// Set config portal channel, default = 1. Use 0 => random channel from 1-13
ESPAsync_wifiManager.setConfigPortalChannel(0);
//////
//set custom ip for portal
//ESPAsync_wifiManager.setAPStaticIPConfig(IPAddress(192, 168, 100, 1), IPAddress(192, 168, 100, 1), IPAddress(255, 255, 255, 0));
#if !USE_DHCP_IP
#if USE_CONFIGURABLE_DNS
// Set static IP, Gateway, Subnetmask, DNS1 and DNS2. New in v1.0.5
ESPAsync_wifiManager.setSTAStaticIPConfig(stationIP, gatewayIP, netMask, dns1IP, dns2IP);
#else
// Set static IP, Gateway, Subnetmask, Use auto DNS1 and DNS2.
ESPAsync_wifiManager.setSTAStaticIPConfig(stationIP, gatewayIP, netMask);
#endif
#endif
// We can't use WiFi.SSID() in ESP32as it's only valid after connected.
// SSID and Password stored in ESP32 wifi_ap_record_t and wifi_config_t are also cleared in reboot
// Have to create a new function to store in EEPROM/SPIFFS for this purpose
Router_SSID = ESPAsync_wifiManager.WiFi_SSID();
Router_Pass = ESPAsync_wifiManager.WiFi_Pass();
//Remove this line if you do not want to see WiFi password printed
Serial.println("Stored: SSID = " + Router_SSID + ", Pass = " + Router_Pass);
// SSID to uppercase
ssid.toUpperCase();
if (Router_SSID == "")
{
Serial.println("We haven't got any access point credentials, so get them now");
digitalWrite(BLUE_LED, LED_ON); // Turn led on as we are in configuration mode.
//it starts an access point
//and goes into a blocking loop awaiting configuration
if (!ESPAsync_wifiManager.startConfigPortal((const char *) ssid.c_str(), password))
Serial.println("Not connected to WiFi but continuing anyway.");
else
Serial.println("WiFi connected...yeey :)");
}
digitalWrite(BLUE_LED, LED_OFF); // Turn led off as we are not in configuration mode.
#define WIFI_CONNECT_TIMEOUT 30000L
#define WHILE_LOOP_DELAY 200L
#define WHILE_LOOP_STEPS (WIFI_CONNECT_TIMEOUT / ( 3 * WHILE_LOOP_DELAY ))
startedAt = millis();
while ( (WiFi.status() != WL_CONNECTED) && (millis() - startedAt < WIFI_CONNECT_TIMEOUT ) )
{
WiFi.mode(WIFI_STA);
WiFi.persistent (true);
// We start by connecting to a WiFi network
Serial.print("Connecting to ");
Serial.println(Router_SSID);
//WiFi.config(stationIP, gatewayIP, netMask);
//WiFi.config(stationIP, gatewayIP, netMask, dns1IP, dns2IP);
WiFi.begin(Router_SSID.c_str(), Router_Pass.c_str());
int i = 0;
while ((!WiFi.status() || WiFi.status() >= WL_DISCONNECTED) && i++ < WHILE_LOOP_STEPS)
{
delay(WHILE_LOOP_DELAY);
}
}
Serial.print("After waiting ");
Serial.print((millis() - startedAt) / 1000);
Serial.print(" secs more in setup(), connection result is ");
if (WiFi.status() == WL_CONNECTED)
{
Serial.print("connected. Local IP: ");
Serial.println(WiFi.localIP());
}
else
Serial.println(ESPAsync_wifiManager.getStatus(WiFi.status()));
}
// Loop function
void loop()
{
// checking button state all the time
btn.tick();
// this is just for checking if we are connected to WiFi
check_status();
}
//event handler functions for button
static void handleClick()
{
Serial.println("\nButton clicked!");
wifi_manager();
}
static void handleDoubleClick()
{
Serial.println("\nButton double clicked!");
}
static void handleLongPressStop()
{
Serial.println("\nButton pressed for long time and then released!");
newConfigData();
}
void wifi_manager()
{
Serial.println("\nConfiguration Portal requested.");
digitalWrite(BLUE_LED, LED_ON); // turn the LED on by making the voltage LOW to tell us we are in configuration mode.
//Local intialization. Once its business is done, there is no need to keep it around
ESPAsync_WiFiManager ESPAsync_wifiManager(&webServer, &dnsServer, "ConfigOnDoubleReset");
//Check if there is stored WiFi router/password credentials.
//If not found, device will remain in configuration mode until switched off via webserver.
Serial.print("Opening Configuration Portal. ");
Router_SSID = ESPAsync_wifiManager.WiFi_SSID();
if (Router_SSID != "")
{
ESPAsync_wifiManager.setConfigPortalTimeout(120); //If no access point name has been previously entered disable timeout.
Serial.println("Got stored Credentials. Timeout 120s");
}
else
Serial.println("No stored Credentials. No timeout");
//Local intialization. Once its business is done, there is no need to keep it around
// Extra parameters to be configured
// After connecting, parameter.getValue() will get you the configured value
// Format: <ID> <Placeholder text> <default value> <length> <custom HTML> <label placement>
// (*** we are not using <custom HTML> and <label placement> ***)
// AIO_SERVER
ESPAsync_WMParameter AIO_SERVER_FIELD(AIO_SERVER_Label, "AIO SERVER", custom_AIO_SERVER, custom_AIO_SERVER_LEN /*20*/);
// AIO_SERVERPORT (because it is int, it needs to be converted to string)
char convertedValue[5];
sprintf(convertedValue, "%d", custom_AIO_SERVERPORT);
ESPAsync_WMParameter AIO_SERVERPORT_FIELD(AIO_SERVERPORT_Label, "AIO SERVER PORT", convertedValue, 5);
// AIO_USERNAME
ESPAsync_WMParameter AIO_USERNAME_FIELD(AIO_USERNAME_Label, "AIO USERNAME", custom_AIO_USERNAME, custom_AIO_USERNAME_LEN /*20*/);
// AIO_KEY
ESPAsync_WMParameter AIO_KEY_FIELD(AIO_KEY_Label, "AIO KEY", custom_AIO_KEY, custom_AIO_KEY_LEN /*40*/);
// Just a quick hint
//ESPAsync_WMParameter hint_text("<small>To reuse already connected AP, leave SSID & password fields empty</small>");
// add all parameters here
// order of adding is important
//ESPAsync_wifiManager.addParameter(&hint_text);
ESPAsync_wifiManager.addParameter(&AIO_SERVER_FIELD);
ESPAsync_wifiManager.addParameter(&AIO_SERVERPORT_FIELD);
ESPAsync_wifiManager.addParameter(&AIO_USERNAME_FIELD);
ESPAsync_wifiManager.addParameter(&AIO_KEY_FIELD);
// Sets timeout in seconds until configuration portal gets turned off.
// If not specified device will remain in configuration mode until
// switched off via webserver or device is restarted.
//ESPAsync_wifiManager.setConfigPortalTimeout(120);
ESPAsync_wifiManager.setMinimumSignalQuality(-1);
// From v1.0.10 only
// Set config portal channel, default = 1. Use 0 => random channel from 1-13
ESPAsync_wifiManager.setConfigPortalChannel(0);
//////
//set custom ip for portal
//ESPAsync_wifiManager.setAPStaticIPConfig(IPAddress(192, 168, 100, 1), IPAddress(192, 168, 100, 1), IPAddress(255, 255, 255, 0));
#if !USE_DHCP_IP
#if USE_CONFIGURABLE_DNS
// Set static IP, Gateway, Subnetmask, DNS1 and DNS2. New in v1.0.5
ESPAsync_wifiManager.setSTAStaticIPConfig(stationIP, gatewayIP, netMask, dns1IP, dns2IP);
#else
// Set static IP, Gateway, Subnetmask, Use auto DNS1 and DNS2.
ESPAsync_wifiManager.setSTAStaticIPConfig(stationIP, gatewayIP, netMask);
#endif
#endif
// Start an access point
// and goes into a blocking loop awaiting configuration.
// Once the user leaves the portal with the exit button
// processing will continue
if (!ESPAsync_wifiManager.startConfigPortal((const char *) ssid.c_str(), password))
{
Serial.println("Not connected to WiFi but continuing anyway.");
}
else
{
// If you get here you have connected to the WiFi
Serial.println("Connected...yeey :)");
Serial.print("Local IP: ");
Serial.println(WiFi.localIP());
}
// Getting posted form values and overriding local variables parameters
// Config file is written regardless the connection state
strcpy(custom_AIO_SERVER, AIO_SERVER_FIELD.getValue());
custom_AIO_SERVERPORT = atoi(AIO_SERVERPORT_FIELD.getValue());
strcpy(custom_AIO_USERNAME, AIO_USERNAME_FIELD.getValue());
strcpy(custom_AIO_KEY, AIO_KEY_FIELD.getValue());
// Writing JSON config file to flash for next boot
writeConfigFile();
digitalWrite(BLUE_LED, LED_OFF); // Turn LED off as we are not in configuration mode.
deleteOldInstances();
MQTT_Pub_Topic = String(custom_AIO_USERNAME) + "/feeds/Temperature";
createNewInstances();
}
bool readConfigFile()
{
// this opens the config file in read-mode
File f = FileFS.open(CONFIG_FILE, "r");
if (!f)
{
Serial.println("Configuration file not found");
return false;
}
else
{
// we could open the file
size_t size = f.size();
// Allocate a buffer to store contents of the file.
std::unique_ptr<char[]> buf(new char[size + 1]);
// Read and store file contents in buf
f.readBytes(buf.get(), size);
// Closing file
f.close();
// Using dynamic JSON buffer which is not the recommended memory model, but anyway
// See https://github.com/bblanchon/ArduinoJson/wiki/Memory%20model
#if (ARDUINOJSON_VERSION_MAJOR >= 6)
DynamicJsonDocument json(1024);
auto deserializeError = deserializeJson(json, buf.get());
if ( deserializeError )
{
Serial.println("JSON parseObject() failed");
return false;
}
serializeJson(json, Serial);
#else
DynamicJsonBuffer jsonBuffer;
// Parse JSON string
JsonObject& json = jsonBuffer.parseObject(buf.get());
// Test if parsing succeeds.
if (!json.success())
{
Serial.println("JSON parseObject() failed");
return false;
}
json.printTo(Serial);
#endif
// Parse all config file parameters, override
// local config variables with parsed values
if (json.containsKey(AIO_SERVER_Label))
{
strcpy(custom_AIO_SERVER, json[AIO_SERVER_Label]);
}
if (json.containsKey(AIO_SERVERPORT_Label))
{
custom_AIO_SERVERPORT = json[AIO_SERVERPORT_Label];
}
if (json.containsKey(AIO_USERNAME_Label))
{
strcpy(custom_AIO_USERNAME, json[AIO_USERNAME_Label]);
}
if (json.containsKey(AIO_KEY_Label))
{
strcpy(custom_AIO_KEY, json[AIO_KEY_Label]);
}
}
Serial.println("\nConfig file was successfully parsed");
return true;
}
bool writeConfigFile()
{
Serial.println("Saving config file");
#if (ARDUINOJSON_VERSION_MAJOR >= 6)
DynamicJsonDocument json(1024);
#else
DynamicJsonBuffer jsonBuffer;
JsonObject& json = jsonBuffer.createObject();
#endif
// JSONify local configuration parameters
json[AIO_SERVER_Label] = custom_AIO_SERVER;
json[AIO_SERVERPORT_Label] = custom_AIO_SERVERPORT;
json[AIO_USERNAME_Label] = custom_AIO_USERNAME;
json[AIO_KEY_Label] = custom_AIO_KEY;
// Open file for writing
File f = FileFS.open(CONFIG_FILE, "w");
if (!f)
{
Serial.println("Failed to open config file for writing");
return false;
}
#if (ARDUINOJSON_VERSION_MAJOR >= 6)
serializeJsonPretty(json, Serial);
// Write data to file and close it
serializeJson(json, f);
#else
json.prettyPrintTo(Serial);
// Write data to file and close it
json.printTo(f);
#endif
f.close();
Serial.println("\nConfig file was successfully saved");
return true;
}
// this function is just to display newly saved data,
// it is not necessary though, because data is displayed
// after WiFi manager resets ESP32
void newConfigData()
{
Serial.println();
Serial.print("custom_AIO_SERVER: "); Serial.println(custom_AIO_SERVER);
Serial.print("custom_SERVERPORT: "); Serial.println(custom_AIO_SERVERPORT);
Serial.print("custom_USERNAME_KEY: "); Serial.println(custom_AIO_USERNAME);
Serial.print("custom_KEY: "); Serial.println(custom_AIO_KEY);
Serial.println();
}
void MQTT_connect()
{
int8_t ret;
MQTT_Pub_Topic = String(custom_AIO_USERNAME) + "/feeds/Temperature";
createNewInstances();
// Return if already connected
if (mqtt->connected())
{
return;
}
Serial.println("Connecting to WiFi MQTT (3 attempts)...");
uint8_t attempt = 3;
while ((ret = mqtt->connect()) != 0)
{
// connect will return 0 for connected
Serial.println(mqtt->connectErrorString(ret));
Serial.println("Another attemtpt to connect to MQTT in 2 seconds...");
mqtt->disconnect();
delay(2000); // wait 2 seconds
attempt--;
if (attempt == 0)
{
Serial.println("WiFi MQTT connection failed. Continuing with program...");
return;
}
}
Serial.println("WiFi MQTT connection successful!");
}
Compile o programa e pressione o botão para gravar.
Ao aparecer a mensagem "Upgrading target on COM...", pressione imediatamente o botão de reset do módulo NINA W102 como modo boot habilitado.
Como podem observar, o programa será transferido!
Adafruit IO configuração
Passo1: Configurando a conta Adafruit IO para LED controlado por IOT
O Adafruit IO é uma plataforma criada no torno do Protocolo MQTT. O MQTT é um protocolo de mensagens leve que captura os clientes de rede com recursos limitados, uma maneira simples de distribuir informações de telemetria. O protocolo que usa um padrão de comunicação / publicação é usado para comunicação com máquina (M2M) e desempenha um papel importante na Internet das Coisas (IoT).
Para este projeto, você deve seguir as etapas a seguir para iniciar o Adafruit IO:
Visite https://io.adafruit.com e crie uma conta.
Depois de criar sua conta, você será direcionado para a tela inicial. Clique em "Feeds" no menu à esquerda.
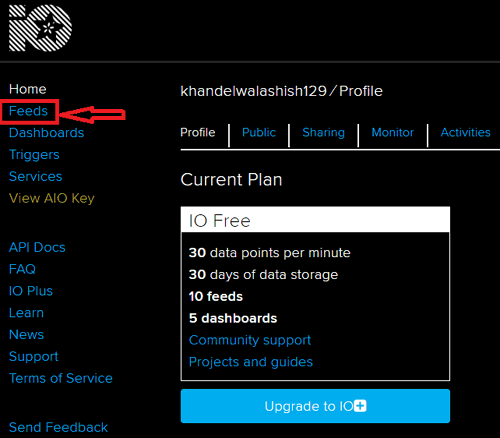
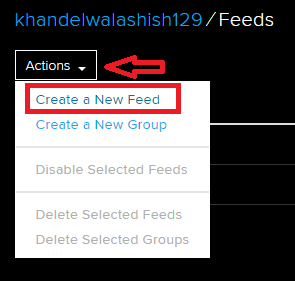
- Agora clique em Ações e crie um novo feed. Em seguida, ele solicitará que você dê um nome ao seu feed. Estou dando a ele LED_Control, você pode fornecer de acordo com você e depois criar e seu feed é criado.
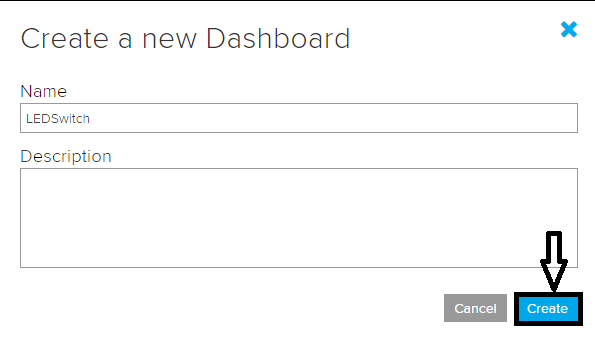
- Agora vá para "Painéis" no menu à esquerda. Clique em Ações e, em seguida, clique em criar um novo painel, dê o nome que desejar; Estou dando "LEDSwitch" e, em seguida, clique em Criar e seu painel será criado.
Exemplo
- Agora abra seu novo painel clicando nele e você será direcionado para uma página em branco. Clicar no botão azul + permitirá adicionar novos componentes de interface do usuário ao painel.

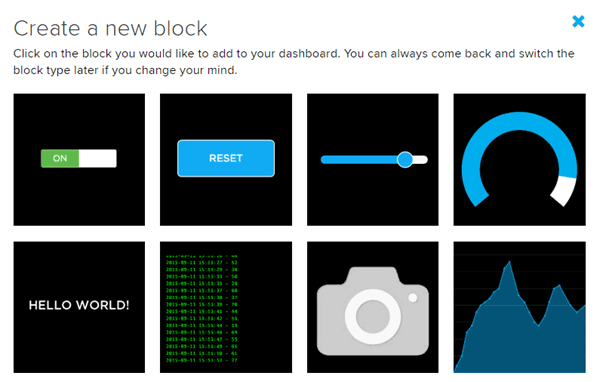
- Para este projeto, só preciso de um botão; portanto, selecione a primeira opção; ele solicitará que você selecione o feed; selecione o que você acabou de criar e mantenha os padrões para o restante das configurações.
- Depois de selecionar a janela do painel, ficará assim:

- Durante a programação, você precisará da sua chave AIO exclusiva, portanto, para isso, clique no botão de chave no canto direito da sua janela.

Criado para publicar Temperatura
- Durante a programação, você precisará da sua chave AIO exclusiva, portanto, para isso, clique no botão de chave no canto direito da sua janela.
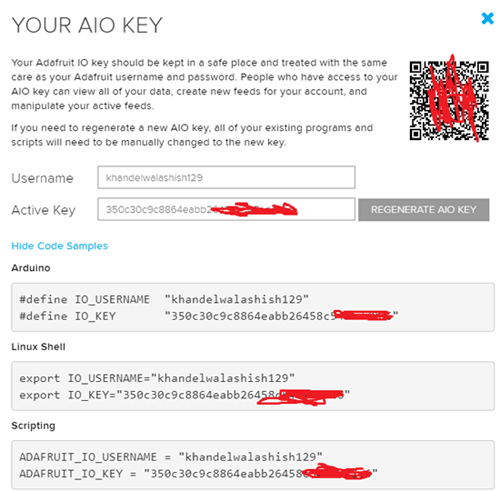
Você pode entrar com elas via portal ou por de modo estático no código
// Default configuration values for Adafruit IO MQTT
// This actually works
#define AIO_SERVER "io.adafruit.com"
#define AIO_SERVERPORT 1883 //1883, or 8883 for SSL
#define AIO_USERNAME "xxxxxxxxx" //Adafruit IO
#define AIO_KEY "xxxxxxxxxxxxxxxxxxxxxxxxxxxxxxxx"
Entrando no Portal
Forçando duas vezes o GPIO27 para GND, entrará no modo Access Point para configuração
Testes com NINA W102
Temperatura 5 Graus sendo publicada (ver código)
Vídeo
Atenção: Foi necessário antes formatar o FS do NINA W102
Dúvidas:
suporte@smartcore.com.br
suporte@smartcore.com.br
DÚVIDAS/QUESTIONS
suporte@smartcore.com.br
Referências:
Referências:


Nenhum comentário:
Postar um comentário