U-BLOX NINA B302 + ETHERNET ACESSANDO
THINGSTREAM.IO

O objetivo deste BLOG é mostrar um exemplo em ARDUINO que permite o NINA B302 se comunicar com um servidor MQTT da U-BLOX (mqtt.thingstream.io) via ETHERNET, baseado no WIZNET W5500. Será utilizada a porta 1883 (non SSL).
Utilize a programação clássica com Sockets do Arduino!
Utilize a programação clássica com Sockets do Arduino!
MQTT
Para os dispositivos de Internet das Coisas (IoT), a conexão com a Internet é um requisito. A conexão com a Internet permite que os dispositivos trabalhem entre si e com serviços de backend. O protocolo de rede subjacente da Internet é o TCP/IP. Desenvolvido com base na pilha TCP/IP, o MQTT (Message Queue Telemetry Transport) tornou-se o padrão para comunicações de IoT.


Implementa também SSL e SN-MQTT
WIZNET W5500
 O chip W5500 é um controlador Ethernet integrado TCP/IP com fio que permite uma conexão mais fácil com a Internet para sistemas embarcados usando SPI (Interface Periférica Serial).

O chip W5500 é um controlador Ethernet integrado TCP/IP com fio que permite uma conexão mais fácil com a Internet para sistemas embarcados usando SPI (Interface Periférica Serial).

Adquirimos então os seguintes componentes


-Botão de RESET;
-Botão de Modo BOOTLOADER (W102);
-Plugável no PROTOBOARD;
-Acesso às várias GPIOS;
Pequena

Instalando Arduino Adafruit no NINA B302
Abaixo o roteiro para você seguir:
Baixe e instale o Arduino IDE
Inicie o Arduino IDE, vá em Preferências e adicione
https://www.adafruit.com/package_adafruit_index.json
Baixe e instale o Arduino IDE
Inicie o Arduino IDE, vá em Preferências e adicione
https://www.adafruit.com/package_adafruit_index.json

como "URL adicional do gerenciador de pastas"
Abra o Boards Manager no menu Tools -> Board e instale o "Adafruit nRF52 by Adafruit"
Selecione sua placa nRF5 no menu Ferramentas -> Placa
Adafruit Bluefruit nRF52 Feather
Abra o Boards Manager no menu Tools -> Board e instale o "Adafruit nRF52 by Adafruit"
Selecione sua placa nRF5 no menu Ferramentas -> Placa
Adafruit Bluefruit nRF52 Feather

OBSERVAÇÃO: Durante a instalação, o Arduino IDE leva alguns minutos para extrair as ferramentas após o download, por favor, seja paciente
Use o gravador SEGGER JLINK para gravar o BREAKOUT com módulo NINA B302, conecte nos pinos do SWCLK (pino 7) e SWDIO (pino 9) do SEGGER JLINK nos pinos SWDCLK e SWDIO do BREAKOUT (pinos nas laterais, próximo à antena). Não esquecer de ligar os GND do BREAKOUT no GND do SEGGER JTAG, bem como alimentar o BREAKOUT com 3.3V.

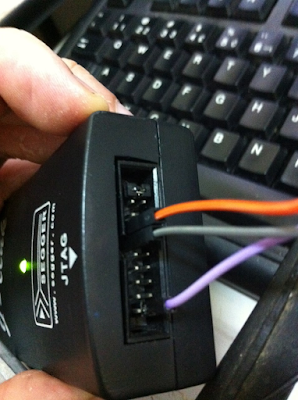
Ligue os pinos SWD DIO e CLK ...

...nestes pinos da placa BREAKOUT

Você pode também usar o ST-LINK V2

Abra J-FLASH lite e grave o bootloader da Adafruit

O mesmo se encontra em
....\packages\adafruit\hardware\nrf52\0.19.0\bootloader\feather_nrf52840_express
Compile depois para o NINA B302
https://github.com/adafruit/Adafruit_nRF52_Bootloader
Com ele, você poderá transferir programas via DFU USB. Maiores detalhes sobre este bootloader
https://learn.adafruit.com/introducing-the-adafruit-nrf52840-feather/update-bootloader
Segundo a documentação, se você pressionar o reset, o módulo aguardará por um certo tempo se há algo sendo enviado pelo Arduino, ou seja, o programa a ser gravado via DFU.
ATENÇÃO, o bootloader usa USB para gravação do NINA 302, OU SEJA, CRIA UMA COMM VIRTUAL, TAMBÉM PARA SER A SERIAL PADRÃO DO ARDUINO
INSTALE OS DRIVERS
https://github.com/adafruit/Adafruit_Windows_Drivers
Conecte na USB + e USB - um cabo USB, AGUARDE INSTALAR OS DRIVERS


https://www.u-blox.com/sites/default/files/NINA-B3_DataSheet_%28UBX-17052099%29.pdf
Ligue os pino do NINA B302 no NINA W102 (com WIFININA GRAVADO)
Conexão com NINA B302 e WIZNET
static const uint8_t SS = (10);----> CS (W5500)
static const uint8_t MOSI = PIN_SPI_MOSI; ----> SI (W5500)
static const uint8_t MISO = PIN_SPI_MISO;----> SO (W5500)
static const uint8_t SCK = PIN_SPI_SCK;----> SCK (W5500)
#define PIN_SPI_MISO (24) //24 original IO8
#define PIN_SPI_MOSI (25) //25 original IO3
#define PIN_SPI_SCK (26) //26 original IO45
IO2 = CS
// D24 .. D26 (aka SPI pins)
32, // D24 is P1.00 (SPI MISO)
15, // D25 is P0.15 (SPI MOSI)
7, // D26 is P0.07 (SPI SCK )
14, // D10 is P0.14

INSTALE LIB
Observe os pré-requisitos
Thanks to Khoi Hoang to help to port WIFI GENERIC to NINA B302
Thanks to Khoi Hoang to help to port WIFI GENERIC to NINA B302
Abra o exemplo
MQTT_THINGSTREAM
Altere
// GOT FROM ThingsStream!
const char *MQTT_SERVER = "mqtt.thingstream.io";
const char *MQTT_USER = "ZZZZZZZZZZZZZZZZZZZZ";
const char *MQTT_PASS = "ZZZZZZZZZZZZZZZZZZZZZZZZZZZZZZZZZZZZZZZZ";
const char *MQTT_CLIENT_ID = "device:ZZZZZZZZZZZZZZZZZZZZZZZZZZZZZZZZZZZZ";
// Only one if the following to be true
#define USE_ETHERNET true //true
#define USE_ETHERNET2 false //true
#define USE_ETHERNET3 false //true
#define USE_ETHERNET_LARGE false
#define USE_ETHERNET_ESP8266 false //true
#define USE_ETHERNET_ENC false
#define USE_CUSTOM_ETHERNET false
Com os dados obtidos do THINGSTREAM

Código final
/****************************************************************************************************************************
MQTT_ThingStream.ino - Dead simple MQTT Client for Ethernet shields
EthernetWebServer_SSL is a library for the Ethernet shields to run WebServer
Based on and modified from ESP8266 https://github.com/esp8266/Arduino/releases
Built by Khoi Hoang https://github.com/khoih-prog/EthernetWebServer_SSL
Licensed under MIT license
*****************************************************************************************************************************/
/*
Basic MQTT example (without SSL!)
This sketch demonstrates the basic capabilities of the library.
It connects to an MQTT server then:
- publishes {Hello from MQTTClient_SSL on NUCLEO_F767ZI} to the topic [STM32_Pub]
- subscribes to the topic [STM32_Sub], printing out any messages
it receives. NB - it assumes the received payloads are strings not binary
It will reconnect to the server if the connection is lost using a blocking
reconnect function. See the 'mqtt_reconnect_nonblocking' example for how to
achieve the same result without blocking the main loop.
You will need to populate "certificates.h" with your trust anchors
(see https://github.com/OPEnSLab-OSU/SSLClient/blob/master/TrustAnchors.md)
and my_cert/my_key with your certificate/private key pair
(see https://github.com/OPEnSLab-OSU/SSLClient#mtls).
*/
#include "defines.h"
#include <PubSubClient.h>
const char my_cert[] = "FIXME";
const char my_key[] = "FIXME";
#define USING_THINGSTREAM_IO true
#if USING_THINGSTREAM_IO
const char *MQTT_PREFIX_TOPIC = "esp32-sniffer/";
const char *MQTT_ANNOUNCE_TOPIC = "/status";
const char *MQTT_CONTROL_TOPIC = "/control";
const char *MQTT_BLE_TOPIC = "/ble";
// GOT FROM ThingsStream!
const char *MQTT_SERVER = "mqtt.thingstream.io";
const char *MQTT_USER = "zzzzzzzzzzzzzzzzzzzzzzzzzzzzz;
const char *MQTT_PASS = "zzzzzzzzzzzzzzzzzzzzzzzzzzzzzzzzzzzzzzzzzzz";
const char *MQTT_CLIENT_ID = "device:zzzzzzzzzzzzzzzzzzzzzzzzzzzzzzzzzzzz";
String topic = MQTT_PREFIX_TOPIC + String("12345678") + MQTT_BLE_TOPIC;
String subTopic = MQTT_PREFIX_TOPIC + String("12345678") + MQTT_BLE_TOPIC;
#else
const char* MQTT_SERVER = "broker.emqx.io"; // Broker address
const char* ID = "MQTTClient_SSL-Client"; // Name of our device, must be unique
String topic = "STM32_Pub"; // Topic to subcribe to
String subTopic = "STM32_Sub"; // Topic to subcribe to
#endif
void mqtt_receive_callback(char* topic, byte* payload, unsigned int length);
const int MQTT_PORT = 1883; //if you use SSL //1883 no SSL
unsigned long lastMsg = 0;
// Initialize the SSL client library
// Arguments: EthernetClient, our trust anchors
EthernetClient ethClient;
PubSubClient client(MQTT_SERVER, MQTT_PORT, mqtt_receive_callback, ethClient);
/*
Called whenever a payload is received from a subscribed MQTT topic
*/
void mqtt_receive_callback(char* topic, byte* payload, unsigned int length)
{
Serial.print("MQTT Message receive [");
Serial.print(topic);
Serial.print("] ");
for (int i = 0; i < length; i++)
{
Serial.print((char)payload[i]);
}
Serial.println();
}
void reconnect()
{
// Loop until we're reconnected
while (!client.connected())
{
Serial.print("Attempting MQTT connection to ");
Serial.println(MQTT_SERVER);
// Attempt to connect
#if USING_THINGSTREAM_IO
int connect_status = client.connect(MQTT_CLIENT_ID, MQTT_USER, MQTT_PASS, topic.c_str(), 2, false, "");
#else
int connect_status = client.connect(ID);
#endif
if (connect_status)
{
Serial.println("...connected");
// Once connected, publish an announcement...
String data = "Hello from MQTTClient_SSL on " + String(BOARD_NAME);
client.publish(topic.c_str(), data.c_str());
Serial.println("Published connection message successfully!");
Serial.print("Subcribed to: ");
Serial.println(subTopic);
// This is a workaround to address https://github.com/OPEnSLab-OSU/SSLClient/issues/9
//ethClientSSL.flush();
// ... and resubscribe
client.subscribe(subTopic.c_str());
// for loopback testing
client.subscribe(topic.c_str());
// This is a workaround to address https://github.com/OPEnSLab-OSU/SSLClient/issues/9
//ethClientSSL.flush();
}
else
{
Serial.print("failed, rc=");
Serial.print(client.state());
Serial.println(" try again in 5 seconds");
// Wait 5 seconds before retrying
delay(5000);
}
}
}
void setup()
{
// Open serial communications and wait for port to open:
Serial.begin(115200);
while (!Serial);
Serial.print("\nStart MQTT_ThingStream on " + String(BOARD_NAME));
Serial.println(" with " + String(SHIELD_TYPE));
Serial.println(ETHERNET_WEBSERVER_SSL_VERSION);
ET_LOGWARN3(F("Board :"), BOARD_NAME, F(", setCsPin:"), USE_THIS_SS_PIN);
ET_LOGWARN(F("Default SPI pinout:"));
ET_LOGWARN1(F("MOSI:"), MOSI);
ET_LOGWARN1(F("MISO:"), MISO);
ET_LOGWARN1(F("SCK:"), SCK);
ET_LOGWARN1(F("SS:"), SS);
ET_LOGWARN(F("========================="));
#if !(USE_BUILTIN_ETHERNET || USE_UIP_ETHERNET)
// For other boards, to change if necessary
#if ( USE_ETHERNET || USE_ETHERNET_LARGE || USE_ETHERNET2 || USE_ETHERNET_ENC )
// Must use library patch for Ethernet, Ethernet2, EthernetLarge libraries
Ethernet.init (USE_THIS_SS_PIN);
#elif USE_ETHERNET3
// Use MAX_SOCK_NUM = 4 for 4K, 2 for 8K, 1 for 16K RX/TX buffer
#ifndef ETHERNET3_MAX_SOCK_NUM
#define ETHERNET3_MAX_SOCK_NUM 4
#endif
Ethernet.setCsPin (USE_THIS_SS_PIN);
Ethernet.init (ETHERNET3_MAX_SOCK_NUM);
#elif USE_CUSTOM_ETHERNET
// You have to add initialization for your Custom Ethernet here
// This is just an example to setCSPin to USE_THIS_SS_PIN, and can be not correct and enough
//Ethernet.init(USE_THIS_SS_PIN);
#endif //( ( USE_ETHERNET || USE_ETHERNET_LARGE || USE_ETHERNET2 || USE_ETHERNET_ENC )
#endif
// start the ethernet connection and the server:
// Use DHCP dynamic IP and random mac
uint16_t index = millis() % NUMBER_OF_MAC;
// Use Static IP
//Ethernet.begin(mac[index], ip);
Ethernet.begin(mac[index]);
// you're connected now, so print out the data
Serial.print(F("You're connected to the network, IP = "));
Serial.println(Ethernet.localIP());
// Note - the default maximum packet size is 256 bytes. If the
// combined length of clientId, username and password exceed this use the
// following to increase the buffer size:
//client.setBufferSize(256);
Serial.println("***************************************");
Serial.println(topic);
Serial.println("***************************************");
}
#define MQTT_PUBLISH_INTERVAL_MS 5000L
String data = "Hello from MQTT_ThingStream on " + String(BOARD_NAME) + " with " + String(SHIELD_TYPE);
const char *pubData = data.c_str();
void loop()
{
static unsigned long now;
if (!client.connected())
{
reconnect();
}
// Sending Data
now = millis();
if (now - lastMsg > MQTT_PUBLISH_INTERVAL_MS)
{
lastMsg = now;
if (!client.publish(topic.c_str(), pubData))
{
Serial.println("Message failed to send.");
}
Serial.print("MQTT Message Send : " + topic + " => ");
Serial.println(data);
}
client.loop();
}
Compile o programa e pressione o botão para gravar.
Ao aparecer a mensagem "Upgrading target on COM...", pressione imediatamente o botão de reset do módulo NINA B302


Como podem observar, o programa será transferido!

Abra a serial e veja ser publicado dados em um Tópico e o CallBack

Servidor MQTT THINGSTREAM recebendo dados do Tópico do NINA B302
https://www.u-blox.com/en/docs/UBX-17056481
https://www.u-blox.com/sites/default/files/NINA-B3_DataSheet_%28UBX-17052099%29.pdf
https://github.com/khoih-prog/WiFiNINA_Generic
https://developer.ibm.com/br/articles/iot-mqtt-why-good-for-iot/
https://www.u-blox.com/sites/default/files/NINA-B3_DataSheet_%28UBX-17052099%29.pdf
https://github.com/khoih-prog/WiFiNINA_Generic
https://developer.ibm.com/br/articles/iot-mqtt-why-good-for-iot/
Sobre a SMARTCORE
A SmartCore fornece módulos para comunicação wireless, biometria, conectividade, rastreamento e automação.
Nosso portifólio inclui modem 2G/3G/4G/NB-IoT/Cat.M, satelital, módulos WiFi, Bluetooth, GNSS / GPS, Sigfox, LoRa, leitor de cartão, leitor QR code, mecanismo de impressão, mini-board PC, antena, pigtail, LCD, bateria, repetidor GPS e sensores.
Mais detalhes em www.smartcore.com.br
Nenhum comentário:
Postar um comentário